Thursday, February 27, 2014

How we clean our nozzles

Click on any image for a larger view.


A couple of colleagues in my neck of the woods were curious how we clean our nozzles.  As you can see in the image above, this one is pretty clogged, but it was still working.  In the past we have had our metals teacher next door use a low temperature torch to melt the filament out of the nozzle but we are always concerned about getting it too hot and altering the size of the opening at the tip.

When we had issues with the Afinia printer, their support crew described a way to clean them so we gave it a try.  So...here's how we do it now;


The image above shows our complete set up.  We took an out of service wood burning iron (tip was broken off in the end of the iron) and clamped it in a screw clamp so it would stand up.  Set the tip on the end of the iron and let it get hot.  Afinia support suggested that we heat the tip in the extruder head then quickly remove it when it reached operating temperature but after checking the operating temps of the wood burner, we settled on doing it this way as it reaches similar temperatures as the extruder heaters on the machines.

We pour a little acetone in the can and when the tip has heated for a while we drop the tip into the can and let it soak for a while.  BEWARE!!!  Acetone is very toxic and the fumes created when you drop the hot tip into the can are no exception.  You need to be sure and have VERY GOOD VENTILATION!!!  Don't breath this stuff and don't get it on your skin!!!

After the tip has soaked in the acetone for a bit, we take it out and blow the tip out with compressed air.  Hang onto the tip or it will go flying across the room!  We repeat this process until the tip is acceptably clean.

As you can see here, the interior is free of filament and you can see that the tip itself is completely open.  Works for us!


Tuesday, February 25, 2014

Image upload issues

Just a quick note to let you know that there seems to be a small issue with images appearing (or not) on this blog.  It's as if they show up for a day or so then disappear for a while.  Not sure why this is happening but I will try to get the issue resolved.  If anybody would like a copy of any images at high resolution just drop me a note and I'll be glad to send them to you.

Printing assemblies

My students are printing a lot lately, some of these are projects that they designed themselves on SolidWorks and some are downloaded from Thingiverse.  I try to keep them balanced whenever possible but for some of my students who have little or no CAD experience we find other ways to challenge them.  One of the ways we try to make them think is to have them print assemblies.  Anyone who has used a 3D printer will attest to the fact that after a while we really want to print something that exceeds the size of our build envelope.  This can be a rather small print as is the case on our Afinia printer (about 5 1/2" by 5 1/2" by 5 1/4") up to a little bit larger capacity on our Replicator 2 (11 1/4" by 6" by 6").

What CAN be done is to build a larger project as an assembly.  This allows the user to overcome the limitations of the build envelope to a certain extent.  Think of Lego's.  Alone, each individual piece is rather small, but by putting multiple pieces together as an assembly you can create quite large things.  This is what students have been trying to work through.  The fit of some of these objects sometimes requires tweaking, which can be one way of teaching students how to use CAD software.  They can start out with a pre-designed object and learn how to "tweak" them in ways to make an assembly fit together much better than the basic design.
This is a microscope design that a student downloaded from Thingiverse and printed.  It uses lenses from the little throwaway cardboard cameras most of us have seen or used at one time or another.  Although most of it worked ok, there are some design alterations that a couple of students are currently working on that should get it to function much better. 

The gear system for raising and lowering the lens tube (this is what acts as a focusing mechanism) has it's issues but the kids should have them ironed out quite soon.

Another assembly that tests our patience is a "snap together" type of assembly.  This one was a lot of fun.  Downloaded from Thingiverse, the print locked together pretty well.  A few minor changes and it should be ready for a small group of LED's in the lamp hood within a week or two.


Saturday, February 22, 2014

The new blog

Although the blog space that we are provided as teachers at our school district has been great, it has been found wanting in many ways.  This has lead me to create a new blog through Google which is much more capable. 

Our attempts to provide students with the most up to date technology are continuing.  A huge thank you goes out to Steve and Brian at our Educational Services District for everything they are doing to help us move forward.  It is because of them that we are expecting a scanner next week and our 4th printer in late March.
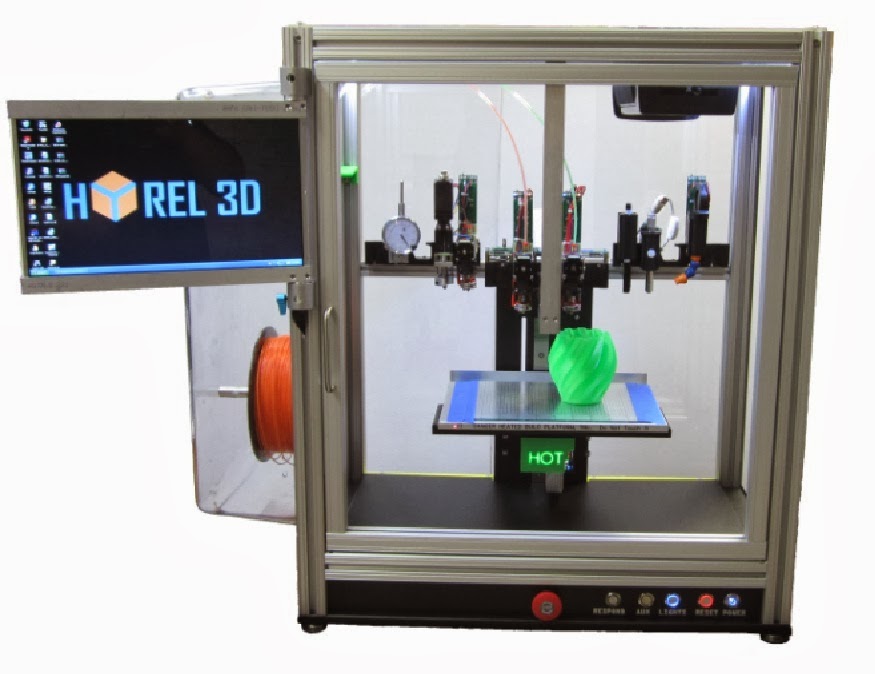
http://www.hyrel3d.com/
This is the new machine from Hyrel we hope to receive by the end of March.  I am presenting at the OACTE conference on April 9 and we would really like to be able to take this with us.

We are also crossing our fingers that Extrusionbot is going to be able to come through with a filament extruder for us as well.  Another product we are itching to get our hands on and run through its paces in the classroom.  The folks at Extruderbot have been incredibly nice and patient with us and we are looking forward to a long, productive and educational relationship with them.
http://www.extrusionbot.net/
Everything that is happening lately is due in large part to the hard work of a lot of different people and we can't even begin to thank them enough.  To my colleagues at SOESD, my new friends at Hyrel and Extrusionbot....thank you all for everything you have done and continue to do for our students.  These kids are learning about things nobody would have thought were possible just a couple of years ago.  Let's keep getting them ready for life after High School!

Filament spool holder, student design

Posted by Scott O. on Wednesday, Jan 29th, 2014.

We are trying to find better ways to feed filament into our machines all the time.  This is a student design that fits neatly into the upper corners of the Replicator 2.  After the initial print, we found that there needs to be a little more iteration to make it perfect. 
 
One of the problems we continue to have is that some of the filaments were would onto the spools quite poorly.  The line crossed itself and if you left a print alone for too long the filament would get caught up on the spool and either pull out of the extruder or the line would simply snap off.  We now have to use an empty spool to re-wind all of our filament properly before we can use it.  We'll let you know how different filament manufacturers faired in our tests and ratings in the coming week.  Students are in the process of testing several variables between different manufacturers products.


Afinia print head failure


We have been printing like crazy with the little Afinia machine. ABS, PLA and using multiple brands of filament. For the most part it has printed very well (as soon as we figured out the "un-removable" raft situation). The PC board that is used as the print surface holds onto rafts exceedingly well and resolution rivals the Replicator 2.

Well, the thing finally succumbed to all of our use and the print head would no longer feed filament. The inevitable "clicking" of the drive mechanism (analogous to the dreaded "blue screen of death" on computers) began and we tried all of our tricks to get it going. Removed the nozzle and feed tube directly above the nozzle, cleaned them thoroughly and tried again. Nope. Got in touch with Afinia support (they are very prompt and helpful by the way) and they suggested heating the nozzle, quickly removing it as soon as it reached temperature then tossing it into acetone to disintegrate any remaining filament. We did this several times until we were absolutely sure that there was nothing left in the parts. Tried feeding ABS and PLA from three different vendors just in case there were slight variations in filament diameter, but nothing would work.

Afinia support finally decided to send us a support ticket number (an RMA number) for shipment of the part back East to Minnesota for troubleshooting. We were asked, and complied with, their request for samples of filament so that they could attempt to replicate the difficulties we were having as closely as possible. Sent it out to them on 1-25-14 so we are just waiting for an answer. Cross your fingers everyone!

http://www.afinia.com/

Print for Ms. Bunge (Drafting Teacher)

Posted by Scott O.

Print job for Mrs. Bunge’s drafting class
The prints included are an iPhone case, a superman logo, a box assembly, a batman emblem, and a sign.
The superman logo print I began the print on 1/15/14 out of ABS and the initial print was successful but there was a slight bow in the tip of the pendant as well as the designer made the 3d image backward but the print was successful but was
The batman symbol
I began the print on the replicator 1 on 01/16/2014 out of ABS and the print was unsuccessful there was a malfunction on either the firmware or the design of which I think it was a extruder heating failure on the left tip.


Re-print if an earlier failure

Pill container. I am testing with this to see if the printer is going to print right. I used the Replicator 1 and ReplicatorG slicing software. I got this off of thingiverse.com link > http://www.thingiverse.com/thing:201304
Stopped it half way thru because it wasn't printing flat. I am going to try re-leveling the bed to see if this helps.


Posted by Billy B.

Student designed angle finder.

Posted by Scott O.


Angle finder for Table saw Incra Jig.
Prototype model #1
Printed on the Replicator 2
I used solidworks 2012 educational edition software
I tried to print on 1/14/15 out of PLA and the prints failed due to an unclean plate (my fault)
I began printing on 1/15/14 in 7th period out of PLA The print was successful I need to make a counter sink hole on the opposite side of the female coupling so a bolt does not have to stick out and increase the size of the square hole but then I’m going on the final print for the angle finder. The prototype broke on the male piece so I’m going to increase the size on it to try to keep it in one piece longer. I increased the size of the male and female couplings so as to strengthen the bonds and put a recess on the back so as to accommodate the nut and bolt the picture is as follows.
The initial print failed due to the filament overlapping on the spool the fix I’m going to apply is I’m going to pull the spool out the spool to the other end of the class to check for hang ups such as this one. I have done the fix that I believe is going to fix the problem and am beginning the print again in PLA.


This angle finder is designed to lock in place at exactly 25 and 50 degrees, which are the angles necessary to create our zig-zag cutting boards out n the shop.  Should allow us to reproduce these products with a lot more precision and repeatibility.

Bottle print with no support material used.

This is the bottle printed on the Afinia with no support material. A very nice print using PLA and we are satisfied with the flexibility of the print and the resolution. Just wish we could get that darned support material removed!

Continuing raft issues


We have re-printed the bottle on the Afinia and are still having a lot of difficulty getting the rafts removed without damaging the prints. The support raft was created at only two layers thick (as opposed to the original three layers thick) which is a suggestion made by Afinia support. As you can see by the image this change to the print parameters did not make a bit of difference. One of the parameter changes that did make a difference however is altering the support angle requirements to a minimum of 10 degrees. This printed the bottle with no support material and it printed quite well. Another change was the use of PLA instead of ABS material. This seems to have been the difference between a thin walled project that holds together as opposed to one that doesn't.

Rafts and their effect on prints


The Afinia printer prints a pretty strong raft (the material which supports a print on the build surface). This raft needs to be removed post print and can sometimes be difficult at best. The Replicator seems to build rafts which are generally easier to remove while the Afinia builds some incredibly tough rafts. In the image at right, the raft removal caused damage to the part itself. We are now printing with a thinner raft to see if this will make a difference. It could have something to do with the removable pierced build plate employed by the Afinia printer but we really don't think so.

Bottle print wins and losses

To the right, you can see the bottle print accomplished with the Replicator 2. This is one of the best prints we have seen come from any of our machines. We're currently trying to re-create this on the Afinia. Printed wiith Natural PLA materal.

Print failures

We currently have three printers at our disposal; Afinia, Replicator 2 and the original Replicator. We have been printing a lot lately and we are learning more with every print. We have instituted a new printing protocol which should help us learn even more from our mistakes (and our wins!). Every print must now be accompanied by a detailed description of parameters used in the print as well as a debriefing of each and every print. Comparisons of individual machines and their strengths and weaknesses are in the process of being recorded as well. Good prints and failures are being reproduced on each machine to assess them. In the photo at left you can see a print fail from the Afinia. Wall thickness cannot be adjusted in the Afinia's slicing program (only in the original solidworks file) and this led to a failure of the walls upon removal from the build platform. We are currently printing the same object on the Afinia with PLA instead of ABS without the use of any support material. It should be noted that the Replicator 2 printed this object perfectly. One of the best prints we have seen coming from this printer!

Chemistry anyone?

This is a gimble style model of a sodium atom we printed. All of the rings (shells) rotate freely and the proper number of electrons are located on each ring. What was interesting about this particular item is that the entire thing was created as a single print, not as separate pieces that had to be assembled later.

Anybody want the entire periodic table in 3D?

Mr. Leairs metal shop


Our Metals teacher, Mr. Leair, came to us and asked if we could design a "foot" for a firewood rack his students were building for one of our staff. His kids used the CNC Plasma torch to cut out a design in the end panel and they needed plastic feet for the rack. Our kids designed and printed 6 feet for it and it looks like this rack design will be a popular item in the future.

3D objects created from 2 dimensional jpeg images


One of the cool things we can do in Solidworks (one of the design software packages we use) is to take a jpeg image and create a printable 3-dimensional object from it. This is a "pi" cookie cutter we created for a math teacher here. Next up will be a GP logo cookie cutter. Available for purchase (donation to our program) soon!

A work in progress

Although we are somewhat limited in space, we try to make the best of it. With three printers currently in our classroom and the hopes of more in the near future we are going to have to get pretty creative with our space. The nice thing is that our students are able to design and create furniture, cabinetry and other necessary items that will allow us to grow in a functional and pleasing way.

There is no better teaching tool than necessity. These students have the opportunity to develop their own learning environment. They are going to be challenged with the development, design and construction of their work spaces. This will definitely need to evolve over time so we will ask future students to improve upon previous ideas.

Our new Replicator 2

Our new Replicator 2 and a special thanks to Steve and Brian down at SOESD. Much larger build plate, finer resolution prints and a much more reliable machine. This thing printed very nicely right out of the box. The Replicator 2 only prints with PLA (no heated bed plate) but this means that drafts and temperature variations don't have such a negative effect on prints. This is what is known as a "Consumer Grade" machine in that it is lower in cost to purchase. We had looked very seriously at a professional machine for purchase this year with Perkins funds but decided against it. For the same price we can purchase several of these consumer machines which will provide more students with access to the machines at any given time.

Creating assemblies

Although the maximum size of a print is limited by the build envelope of any particular machine, this does not mean that we cannot create larger items. Multiple parts can become parts and pieces of an assembly to create items of greater size and complexity. Amazingly, these machines are able to print in exquisite detail allowing students to create functional mechanical pieces.

Can 3D printing technology benefit other departments at our school?


We're trying to promote ourselves and the technology we are using to other departments at our school Being a former Biology teacher myself I know just how expensive it can be to purchase various items for the science classroom. We can print literally anything in 3 dimensions that the mind can imagine and we can print them with any design parameters a teacher needs.

CNC router

Some of the first work that has been done by students trying to get our tiny little CNC router up and running. It works but definitely has it's limitations due to it's small size. Not only that but the computer we have to run the machine is a little old (still has a 5 1/4 floppy drive on it).

Reverse engineering by a student

The Gentleman who has been so instrumental in getting us off the ground with 3D printing came to one of our students with a problem. He was having no luck finding some replacement drawer slides for a piece of furniture he had at home so he asked me if a student could reverse engineer them for him. After a couple of test designs and prints we finally came up with a perfect fit. This is one part of the slide pictured below the original.

Improving our print environment


Some corner blocks pulled from Thingiverse and printed on the original Replicator. These are used in concert with 1/4 inch plexiglass to create a little bit of environmental control for our printers. These machines need a consistent temperature (drafts can seriously affect a print) and a clean environment to function consistently. Next to the Woodshop is not exactly the greatest idea but it is what we have to work with right now.

Our first printer, the Makerbot Replicator.


Our original Replicator. We have had this machine for about a year now and it has really been put through it's paces. This is a great machine for teaching because it requires a lot of tinkering and troubleshooting in order to get consistent prints. This provides students with a more in-depth understanding of just how the printer functions and has required them to work harder at their original designs to produce the desired results. This is not one of those "print right out of the box" machines.

Student Prints


A lot of support material for this one!


To the right is a small salt shaker that a student
downloaded from Thingiverse.

I wanted to post examples of some of our students work using the 3D printer and the CNC router. Some of the items are pre-designed (pulled from Thingiverse) while others are newly designed or reverse engineered by students.

Darth Vader was printed by a student to give as a gift to a relative that was undergoing Cancer therapy.


Grants Pass High School and 3D Printing

It's time to start getting the word out. Most folks know us as the "Woodshop" when in reality things-they-are-a-changing. We are beginning to transition into what will be known for the foreseeable future as a "Manufacturing" program.

What does this mean? Well, it means that we are working hard to promote multiple materials manufacturing in our program. Ok, so what does this really mean? We will still continue to design and create beautiful and functional pieces of furniture and cabinetry right here in our little shop, but we will also expose our students to other design strategies and materials. This includes but is not limited to design software such as Solidworks, Google Sketchup, Inventor, Photoshop to name a few. We also have 3D printers available to our students and we are working diligently to get CNC routing embedded inot our program.

What this all means is that students will have the opportunity to expand their knowledge base and to acquire hands-on experience with some of the current and emerging technologies used in today's industrial environments.

We are currently using the following equipment:

Makerbot Replicator 3D printer
Makerbot Replicator 2 3D Printer
Afinia 3D printer
Techno Mini CNC router